
This recipe yields a fragrant and rustic herb-filled bread, perfect for dipping in olive oil, serving alongside soups, or enjoying as a savory snack. The combination of warm, fluffy dough with an aromatic herb and garlic filling creates a truly delightful culinary experience. This bread is not only delicious but also a beautiful addition to any table, offering a comforting and flavorful treat.
Preparation Time: 20 minutes (plus 1 hour rising time)
- This includes mixing the dough and preparing the herb filling.
Cook Time: 20 minutes
- This is the baking time for the bread.
Total Time: 1 hour 40 minutes
- This includes all preparation, rising, and baking time.
Ingredients:
For the Dough:
- 300 ml lukewarm water (about 1 1/4 cups)
- 2 tsp dry yeast (about 7 g or 1/4 oz)
- 1 tbsp sugar (about 12 g or 1/2 oz)
- 425 g all-purpose flour (about 3 1/3 cups)
- 1 tsp salt (about 6 g or 1/5 oz)
- 60 ml olive oil (about 1/4 cup)
For the Herb Filling:
- 5-8 tbsp olive oil (about 75-120 ml or 1/3-1/2 cup)
- 5-6 garlic cloves (about 25-30 g or 1 oz), minced
- Fresh or dried rosemary (to taste)
- Fresh or dried thyme (to taste)
- Fresh or dried basil (to taste)
- Fresh or dried oregano (to taste)
- Coarse salt (for sprinkling)
- Chili flakes (to taste)
- Marjoram (to taste)
Instructions:
- Prepare the Dough:
- In a small bowl, combine the lukewarm water, dry yeast, and sugar. The water should be warm but not hot (around 105-115°F or 40-46°C) to activate the yeast without killing it.
- Let the mixture sit for about 5 minutes, or until it becomes frothy. This indicates that the yeast is active and ready to use.
- In a large mixing bowl, whisk together the all-purpose flour and salt. This ensures the salt is evenly distributed throughout the dough.
- Pour the yeast mixture and olive oil into the flour mixture.
- Using a spoon or a stand mixer with a dough hook, mix the ingredients until a shaggy dough forms.
- Transfer the dough to a lightly floured surface and knead it for about 10 minutes, or until it is smooth and elastic. If using a stand mixer, knead with the dough hook for about 5-7 minutes.
- Place the kneaded dough in a lightly oiled bowl, turning it to coat all sides with oil. This prevents the dough from drying out.
- Cover the bowl with a damp cloth or plastic wrap and place it in a warm, draft-free place to rise. A warm oven (turned off) or a sunny spot works well.
- Let the dough rise for about 1 hour, or until it has doubled in size.
- Prepare the Herb Filling:
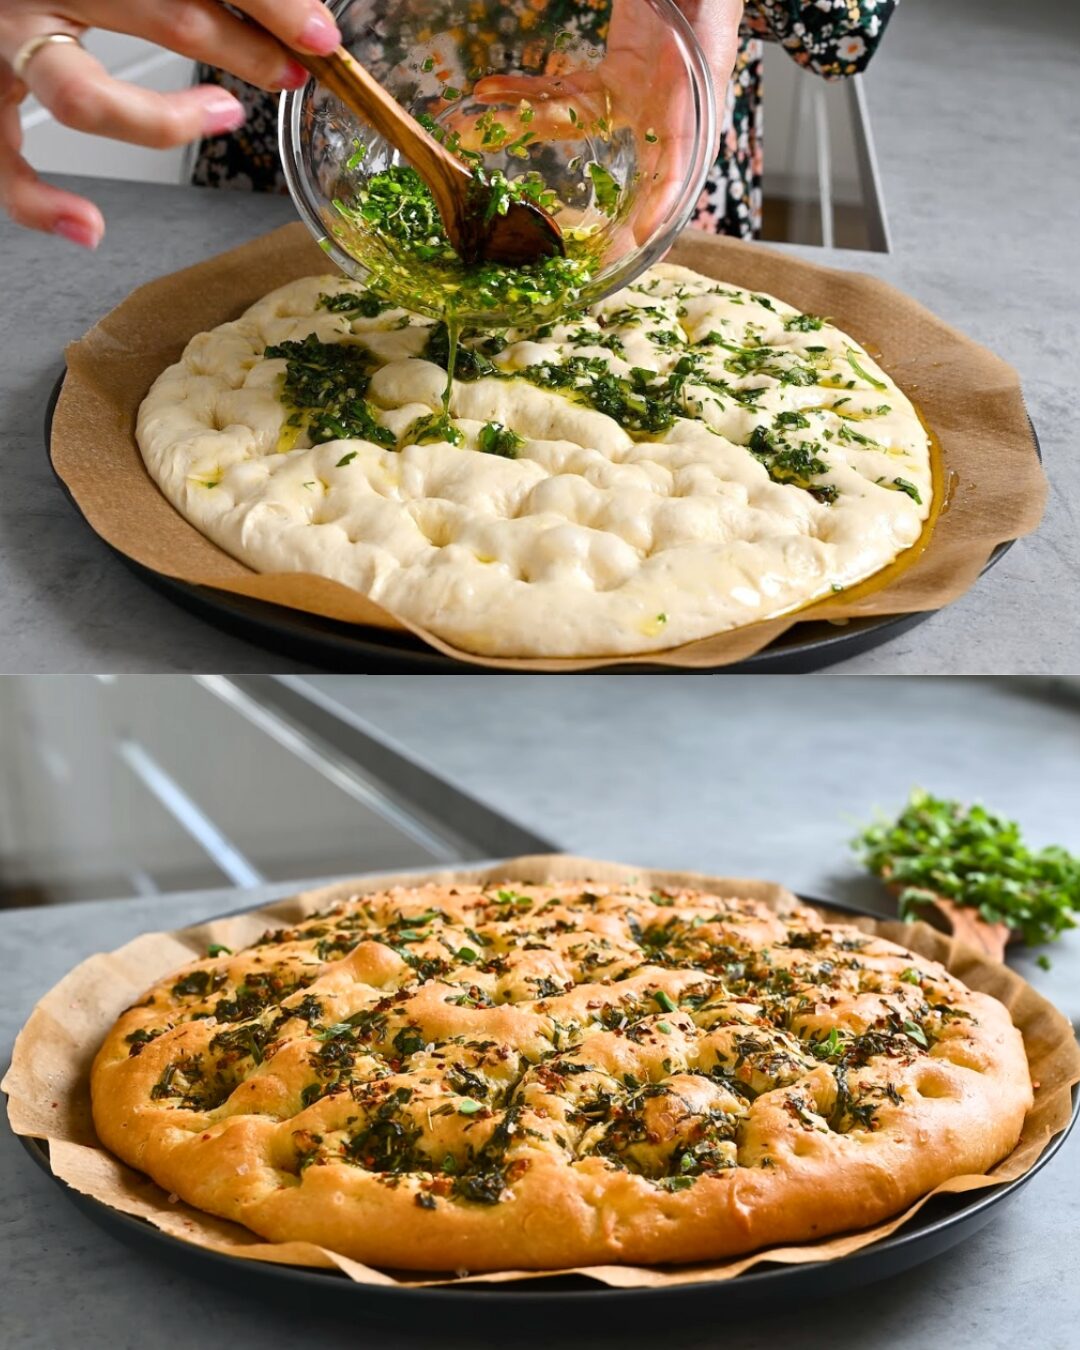
- In a small bowl, combine 5-8 tablespoons of olive oil with the minced garlic, rosemary, thyme, basil, and oregano. Adjust the amount of herbs to your taste preferences.
- Adding more olive oil will create a more soaked through herb flavor.
- Mix the herb filling thoroughly, ensuring the garlic is evenly distributed.
- Shape and Assemble the Bread:
- Preheat your oven to 200°C (about 400°F).
- Once the dough has doubled in size, punch it down to release any air bubbles.
- Transfer the dough to a lightly floured surface.
- Using a rolling pin, roll out the dough into a rectangle, approximately 12×18 inches.
- Spread the herb and garlic mixture evenly over the surface of the dough, leaving a small border around the edges.
- Starting from the long edge, roll the dough tightly into a log.
- Place the log seam-down on a baking sheet lined with parchment paper.
- Cover the dough with a clean cloth and let it rest for another 15-20 minutes. This second rise allows the dough to relax and ensures a light and airy texture.
- Bake the Bread:
- Before baking, brush the top of the dough with a little olive oil. This will give the bread a beautiful golden-brown color.
- Sprinkle the top generously with coarse salt. The salt adds a crunchy texture and enhances the herb flavors.
- Bake the bread in the preheated oven for about 20 minutes, or until it is golden brown and sounds hollow when tapped on the bottom.
- Keep an eye on the bread to prevent over browning.
- Garnish:
- Once the bread is baked, remove it from the oven and let it cool slightly on a wire rack.
- Sprinkle the top with chili flakes and marjoram to taste. This adds a touch of spice and a fresh, herbaceous note.
- Serve:
- Slice the warm herb-filled bread and serve it immediately.
- Serve with extra virgin olive oil for dipping.
Nutritional Information (per serving):
- Calories: 250 kcal
- Protein: 5 g
- Fat: 12 g
- Carbohydrates: 30 g
- Fiber: 2 g
The Origins and Popularity of This Recipe:
Herb-filled bread has roots in various Mediterranean culinary traditions, where bread is a staple and herbs grow abundantly. The combination of simple dough with aromatic herbs and garlic reflects the rustic and flavorful cooking style of these regions. The popularity of this recipe stems from its versatility, ease of preparation, and the ability to customize the herb blend to personal preferences. It is a perfect accompaniment to meals, a delightful appetizer, or a simple snack. The act of baking bread is also an activity that many find comforting. The smell of baking bread and herbs fills a home with a sense of warmth and welcome. The ability to use fresh or dried herbs also allows this recipe to be made year round.
Why You’ll Love This Recipe:
- The aromatic herb filling adds a burst of flavor to the warm, fluffy bread.
- It’s easy to customize with your favorite herbs and spices.
- It’s perfect for dipping in olive oil or serving alongside soups and salads.
- The rustic look of the bread makes it beautiful as a center piece.
Health Benefits:
- Provides carbohydrates for energy.
- Contains healthy fats from olive oil.
- Herbs offer various antioxidants and health benefits.
- Homemade bread is often lower in additives than store-bought bread.
Serving Suggestions:
- Serve warm with extra virgin olive oil for dipping.
- Pair with soups, stews, or salads.
- Use it to make sandwiches or bruschetta.
- Serve as an appetizer at gatherings.
Tips:
- Use lukewarm water to activate the yeast.
- Knead the dough thoroughly for a smooth and elastic texture.
- Let the dough rise in a warm, draft-free place.
- Adjust the herb blend to your taste preferences.
- Brush the top with olive oil before baking for a golden-brown crust.
Variations to Try:
- Add grated Parmesan or other cheeses to the herb filling.
- Use sun-dried tomatoes or olives in the filling.
- Add caramelized onions or roasted garlic to the filling.
- Make individual herb-filled rolls instead of a loaf.
- Use whole wheat flour for a healthier version.
Conclusion:
This aromatic herb-filled bread is a delightful and versatile recipe that’s sure to impress. With its simple preparation and customizable flavors, it’s a perfect addition to any meal. Enjoy!
Frequently Asked Questions (FAQ):
- Can I use active dry yeast instead of instant yeast?
- Yes, but you’ll need to proof it in warm water for 10 minutes before adding it to the flour.
- Can I use whole wheat flour?
- Yes, but you may need to add more water as whole wheat flour absorbs more liquid.
- How do I know when the dough is properly kneaded?
- The dough should be smooth and elastic, and it should spring back when lightly pressed.
- Can I make this bread ahead of time?
- Yes, you can prepare the dough ahead of time and refrigerate it overnight. Let it come to room temperature before shaping and baking.