
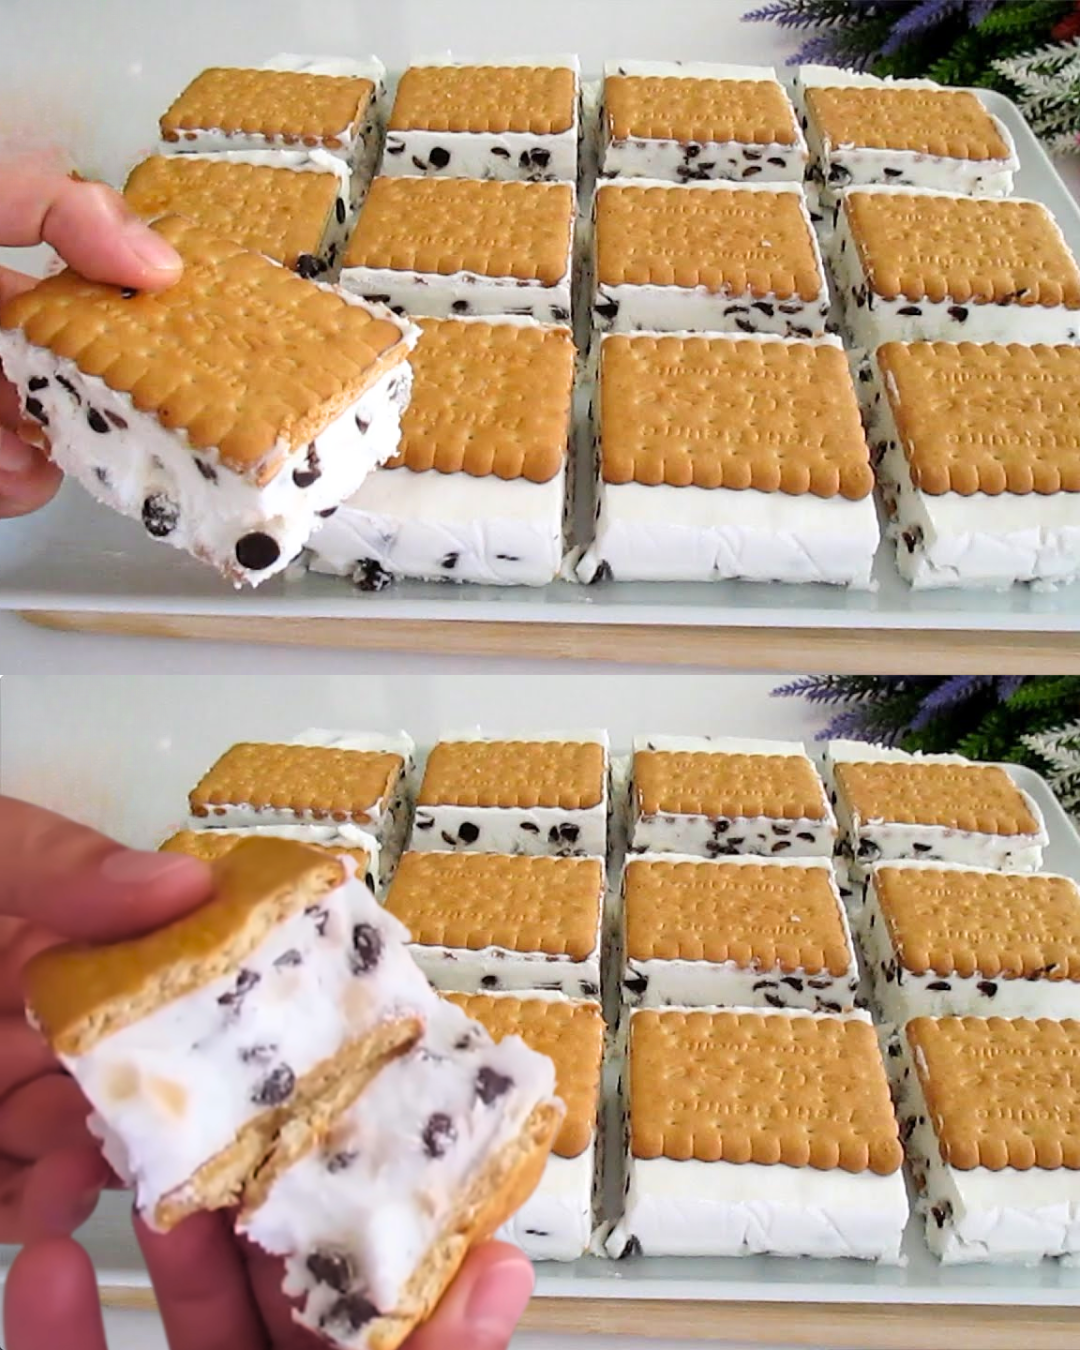
This No-Bake Frosted Pie is a delightful and incredibly simple dessert that requires just three ingredients and three minutes of prep time. The creamy layers of whipped cream and chocolate chips, nestled between crunchy square biscuits, create a mouth-watering combination that’s perfect for any occasion. The first bite offers a symphony of textures and flavors: the smooth, velvety cream contrasts beautifully with the crispy biscuits, while the chocolate chips add bursts of sweetness and richness.
No-bake desserts like this frosted pie are not only easy to make but also a hit at gatherings and family dinners. The simplicity of the ingredients means you can whip this up without any hassle, and the result is a frozen treat that’s both refreshing and indulgent. Whether you’re hosting a summer barbecue or a cozy indoor gathering, this pie is sure to impress your guests. Keep this pie in the freezer and enjoy a slice whenever you need a quick and delicious dessert fix. It’s sure to become a family favorite, especially because you can prepare it in advance and have it ready whenever the sweet craving strikes.
Recipe:
Ingredients:
- 24 plain square biscuits
- 2 bags of whipped cream (150 grams)
- 2 glasses of cold milk (400 ml)
- 1 cup of chocolate chips (170 grams)
Directions:
- Cover the edges of a 20×30 cm mold with cling film. This will help you easily remove the pie once it’s set.
- Place 12 plain square biscuits at the bottom of the mold, arranging them neatly to cover the entire base. Ensure the biscuits are evenly spaced to form a solid foundation.
- In a large bowl, combine the whipped cream powder and cold milk. Using an electric mixer, beat the mixture at high speed until it reaches a thick and fluffy consistency. This should take about 2-3 minutes. The consistency should be firm enough to hold its shape when spread.
- Gently fold in the chocolate chips into the whipped cream mixture, ensuring they are evenly distributed. The chocolate chips add a delightful crunch and bursts of chocolatey flavor throughout the pie.
- Pour and spread the whipped cream mixture over the layer of biscuits in the mold, smoothing it out with a spatula to create an even layer. Ensure that the cream fills all the gaps between the biscuits for a uniform texture.
- Place the remaining 12 biscuits on top of the whipped cream layer in the same direction as the bottom layer. Press them down slightly to ensure they stick to the cream and form a cohesive top layer.
- Cover the entire mold with cling film, making sure it’s tightly sealed to prevent any freezer odors from affecting the pie. This also helps prevent freezer burn and keeps the dessert fresh.
- Freeze the pie for at least 4-5 hours until fully set. This allows the whipped cream to firm up and the flavors to meld together. The longer the pie stays in the freezer, the firmer it will become.
- After freezing, remove the mold from the freezer and carefully lift the cling film to release the pie from the mold. Let it sit for a couple of minutes if it’s too hard to slice immediately.
- Slice the pie into servings and enjoy this incredibly delicious no-bake frosted pie with family and friends. Serve immediately for the best texture and taste.
Prep Time: 3 minutes | Cooking Time: None | Total Time: 4-5 hours (including freezing time)
Kcal: 220 kcal per serving | Servings: 12 servings
Additional Tips:
- Whipped Cream Tips: If you want a more stable whipped cream, you can use a little gelatin dissolved in water or a commercial stabilizer. This will help the whipped cream hold its shape longer, especially on warm days.
- Flavor Variations: Add a teaspoon of vanilla extract to the whipped cream for a richer flavor. You can also use flavored whipped cream powders for a different taste experience.
- Biscuit Alternatives: If you can’t find plain square biscuits, graham crackers or any other plain tea biscuits will work just as well. Just ensure they fit the mold size.
- Serving Ideas: Serve each slice with a dollop of extra whipped cream and a sprinkle of chocolate chips or cocoa powder on top for a decadent presentation.
- Storage: Keep any leftovers covered in the freezer to maintain freshness. This pie can be stored for up to two weeks, making it a great make-ahead dessert option.
- Temperature: When ready to serve, let the pie sit at room temperature for a few minutes to make slicing easier, but don’t let it thaw completely to avoid losing its firm texture.
- Healthier Option: For a lighter version, you can use low-fat whipped cream and reduce the amount of chocolate chips.
Additional Information:
- Texture Balance: The combination of crunchy biscuits and creamy filling creates a delightful textural contrast. This makes each bite interesting and satisfying, appealing to different taste preferences.
- Kid-Friendly: This recipe is a fantastic activity for kids. They can help layer the biscuits and spread the whipped cream, making it a fun and educational cooking experience.
- Occasions: This no-bake frosted pie is perfect for summer picnics, potlucks, and birthday parties. Its quick preparation and delicious taste make it an ideal choice for any festive occasion.
- Nutritional Value: While this dessert is indulgent, it can be enjoyed as part of a balanced diet. Pair it with a fresh fruit salad for a refreshing and nutritious complement.